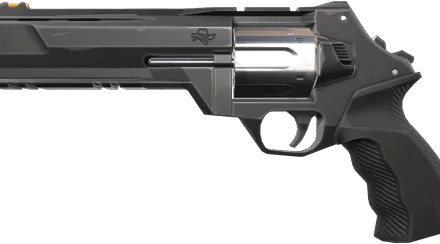
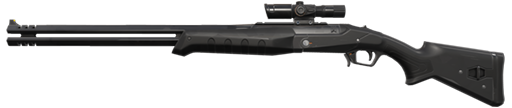
The Outlaw is Valorant’s first new weapon since launch, arriving in Episode 8 Act 1 as a double-barrel, break-action sniper rifle that bridges the gap between the Marshal and Operator. With a unique blend of damage, versatility, and rate of fire, the Outlaw offers a fresh tactical dimension to both casual and competitive Valorant matches. Whether you’re looking to optimize force-buy rounds, capitalize on quick follow-up shots, or introduce dynamic agent synergy into your lineup, mastering the Outlaw is essential for elevating your gunplay and strategy on any map.
Outlaw Weapon Overview and Core Stats
- Type: Double-barrel sniper rifle
- Cost: 2,400 credits
- Magazine: 2 rounds, 10 reserve
- Base Damage: 140 (body), 238 (headshot, 1.7x), 119 (leg, 0.85x)
- Scope Zoom: 3.5x
- Wall Penetration: High
- Rate of Fire: 2.75 rounds/second
- Reload: 2.3 seconds (one shell), 3.8 seconds (both shells)
- Movement Speed: 5.4 m/s
- Equip Speed: -0.2% (4.32 m/s)
The Outlaw stands out with its ability to eliminate lightly armored opponents with a single shot to the body or head, while its fast fire rate and high wall penetration make it an excellent option for holding angles, trading quick kills, and managing force/economy rounds strategically.
For a deep dive into statistics and historical data, check the Outlaw guide at esportsrambles.com.
Unique Features and Gameplay Mechanics
- Stay in Scope After Firing: Unlike other snipers in Valorant, Outlaw users can fire both barrels without being kicked out of ADS, allowing smoother double-taps and faster threats against grouped enemies.
- Versatile Body Damage: It can eliminate unarmored or light-armored targets in a single body shot, and nearly finish off most foes with heavy shields, setting up easy follow-ups.
- Double-Barrel Action: The two-shell magazine creates a rhythm of deliberate aggression followed by brief vulnerability during reload—players must carefully choose when and how to peek or reposition.
Check out additional tactics on Dignitas.gg’s tips and tricks article.
Practical Outlaw Strategies and Force-Buy Excellence
- Force-Buy and Half-Buy Power: On low-credit or force-buy rounds, the Outlaw outperforms rifles if used to hold long angles, especially when paired with a strong sidearm.
- Pistol Combos: After damaging opponents with the Outlaw, finish with a pistol (such as the Shorty or even Chamber’s Head Hunter) for swift trade kills. This synergy can swing eco rounds or neutralize multiple threats in fast succession.
- High Wall Penetration: Use the Outlaw to punish common wallbang spots and disrupt push timings through smokes or thin cover.
- Economic Value: The 2,400 credit cost enables high-damage play while leaving budget for shields or utility, and fits well into rounds when your team can’t afford full rifles or Operators.
For side-by-side strategy analysis, refer to Mandatory.gg’s expert Outlaw usage guide.
Agent Synergy: Who Excels with Outlaw?
- Chamber: The Head Hunter ability allows instant follow-up to finish wounded enemies, and Chamber’s quick weapon switch maximizes the Outlaw’s body shot potential.
- Jett: Utilize Jett’s mobility to reposition after Outlaw shots for aggressive multi-kill setups or quick escapes.
- Sova & Raze: Sova’s Shock Darts and Raze’s grenades can finish off enemies softened by Outlaw shots, maximizing lethality in post-plant or close-quarters fights.
- Fade: Weaken and reveal enemies before striking with Outlaw’s high damage.
For a broader list of agent recommendations and combination tactics, read Bo3.gg’s comprehensive Outlaw guide.
Optimal Maps and Situational Positioning
- Bind: Excellent for holding A Heaven, teleporter exits, or showers peaks where tight sightlines compress enemy approach angles.
- Split: Use the Outlaw to control B Rafters and Mid Vents, where follow-up shots win quick trade duels.
- Ascent: Ideal for contesting A Main, Mid Top, or B Lane, especially in crossfire setups.
- Icebox: Lock down A Rafters or B Green with rapid barrier-to-barrier trades.
For a deeper look at map-by-map positioning and site tactics, consult Sports Illustrated’s Valorant Outlaw guide.
Advanced Tips for Outlaw Mastery
- Keybind Customization: Switch scope toggle to hold for rapid peeking.
- Armor Awareness: Prioritize aiming for the upper body or head against shielded opponents for one-shot kills.
- Reloading Discipline: Always reload after an engagement, but be mindful of the distinct sound cue when reloading both barrels – enemies may capitalize on your downtime.
- Position Smartly: Favor off-angles and covers that let you retreat, as the Outlaw leaves you vulnerable when empty.
Discover more training and mechanical advice at Eloking’s Outlaw tips blog.
Frequently Asked Questions about the Valorant Weapon Outlaw
What makes the Outlaw unique compared to Marshal and Operator?
The Outlaw fits between the Marshal and Operator regarding price (2,400 credits) and damage. Its double-barrel design allows two rapid shots without leaving ADS, making it effective for multi-kills and fast duels without the penalty of rescoping found in other snipers.
Can the Outlaw one-shot kill an enemy?
Yes, the Outlaw can kill enemies with no armor or light armor in one body or headshot. Fully shielded opponents will go down in one headshot or two body shots, except for leg shots on those with light armor.
How is the Outlaw’s wall penetration ranked?
The Outlaw features high wall penetration, rivalling the Operator, making it ideal for holding common wallbang spots and denying enemy pushes through thin cover or smokes.
How fast does the Outlaw fire and reload?
The Outlaw fires at 2.75 rounds per second and has a reload speed of 2.3 seconds for one shell or 3.8 seconds for both shells. Its swift fire rate among snipers makes it dangerous in skilled hands.
What agents pair best with the Outlaw?
Agents like Chamber (for quick Head Hunter follow-up), Jett (for mobility), Raze, Sova (for utility finishers), and Fade are ideal Outlaw users. Their toolsets complement the sniper’s strengths by finishing weakened enemies or repositioning after shots.
When should I buy the Outlaw?
The Outlaw shines on half-buy or force-buy rounds, especially when you have enough credits for sidearms and minimal armor. It’s an economic powerhouse for cost-effective sniping or trading up against rifles and SMGs.
Which maps are best for the Outlaw?
The Outlaw excels on maps with medium-to-long sightlines and defensible close angles, such as Bind, Split, Ascent, and Icebox. Use it where you can control tight corridors or peek common entry points for double kills.
What’s the best way to finish an enemy who survives an Outlaw shot?
Switch instantly to a pistol or agent-specific sidearm after softening an enemy with the Outlaw. Weapons like the Shorty (for close, jump-in finishes) or Chamber’s Head Hunter make sure no damage goes to waste.
How does the Outlaw handle compared to rifles?
While Outlaw is less versatile in close-quarters than rifles, it dominates any gunfight at range or holding a narrow angle. Its high damage and double-barrel setup let you contest rifles aggressively on eco rounds.
Does the Outlaw kick you out of ADS when firing?
No, a key advantage of the Outlaw is that you stay scoped-in after each shot. This allows for fast, consecutive engagements and keeps you battle ready for two back-to-back peeks.
Are there any sound cues I should be aware of?
Yes, the Outlaw’s reload sound is audibly distinct—enemies will know when you’re reloading both barrels for 3.8 seconds. This presents a tactical risk, so reload only when covered or after securing a position.
For further expert breakdowns and situation analyses, see this Dignitas.gg guide.